Its possible to upgrade Nagios CORE to the latest version by just following these simple steps. This article covers upgrade, backup and restore in case of a failure.The Latest Version of Nagios CORE is 4.2.4 as of January,2017 for which you can download the Source files from Nagios Website. The process would involve stopping of Nagios and Apache service, compiling Nagios from source and then restart both the services. You need to be admin/Root user to implement the upgrade.
Steps to Upgrade Nagios
There are 2 ways of Backing up Nagios
- Taking a snapshot via vSphere (VMware) if it’s a VM.
- Follow the backup process defined below
Backup Nagios Config and Plugins before proceeding
The upgrade process wont overwrite any of your config files but it’s a good practise to be on a safe side. Login into SSH terminal of the Nagios Server and then copy and compress (tar) the files of Nagios as a backup in case of a failover.
Stop Nagios and Apache service
# service nagios stop
# service httpd stop
Create a directory in “/tmp” called “nagios_backup” and copy & compress Nagios files
# mkdir /tmp/nagios_backup
# tar -cvvzf /tmp/nagios_backup/nagios_bkp.tar /usr/local/nagios
The above command makes a copy of this location
/usr/local/nagios/bin,etc,libexec,sbin,share,var
Backed up files you will have now would be as given below. Copy them to an alternate location if required.
# /tmp/nagios_bkp.tar
Download and upgrade Nagios to version 4.x.x
Download the new version of Nagios v4.2.4
# cd /tmp
# wget https://assets.nagios.com/downloads/nagioscore/releases/nagios-4.2.4.tar.gz
Untar the package to start install process
# tar -zxvf /tmp/nagios-4.2.4.tar.gz
NOTE: Make sure you have installed unzip as the upgrade requires it.
# yum -y install unzip
New directory will be created called nagios-4.2.4. cd into it and start the source install
# cd /tmp/nagios-4.2.4
# ./configure --with-command-group=nagcmd
# make all
# make install
Verify the upgrade and restart required services
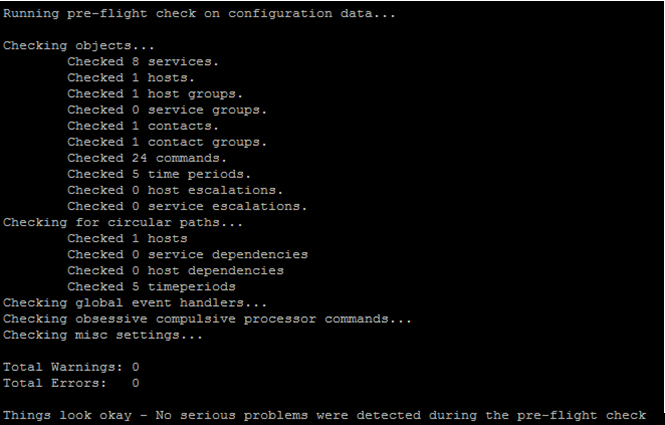
Once the above process is completed run the verification check on the upgrade to make sure there are no errors reported.
# /usr/local/nagios/bin/nagios -v /usr/local/nagios/etc/nagios.cfg
Output:

If no errors found then go ahead and restart Nagios & Apache service. If any errors are found it would be displayed during the pre-flight check and can be act upon accordingly.
# service nagios restart
# service httpd restart
Login into Nagios Server and make sure all the hosts and services are up and running.
Link: http://nagios-server/nagios/
Steps for Restore (in case of a Failover)
There are 2 ways of restoring Nagios
- Rollback the snapshot via vSphere (VMware) if it’s a VM.
- Follow the restore process defined below
Restore Nagios version to 4.x.x from the backup (config and plugins)
Login into SSH terminal of the Nagios Server and cd into /tmp folder where the backup was saved.
# cd /tmp/nagios_backup/
Untar the tar backup file
# tar -xvf nagios_bkp.tar
Once the Untar is done, we need to delete the upgraded Nagios config files and the replace them with the previous version of Nagios 4.x.x (NOTE: This is solely your responsibility so please make sure to backup before proceeding)
# rm -r /usr/local/nagios/*
Copy the backup files into /usr/local/nagios (default Nagios Folder)
# cp -rp /tmp/nagios_backup/usr/local/nagios/* /usr/local/nagios/
Note: Make sure “-p” is used so that the folder and files owner and permissions are preserved.
Verify the downgrade and restart required services
Once the above process is completed run the verification check on the upgrade to make sure there are no errors reported.
# /usr/local/nagios/bin/nagios -v /usr/local/nagios/etc/nagios.cfg
Output:

If no errors found then go ahead and restart Nagios & Apache service. If any errors are found it would be displayed during the pre-flight check and can be act upon accordingly.
# service nagios restart
# service httpd restart
Login into Nagios Server and make sure all the hosts and services are up and running.
Link: http://nagios-server/nagios/

